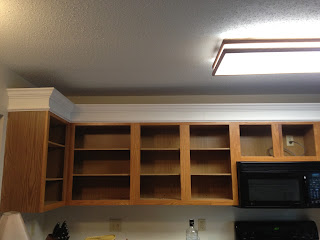
As I had stated in our first post, the project is extending and painting the kitchen cabinets. I know, don't ask why on earth we decided to start with a huge project like this! All I can really come up with is; "go big or go home!"..
The kitchen cabinet extension is completed so we will go over that part. I am going to have to give credit to the idea to TheLetteredCottage.net . I absolutely LOVE their blog and read it on a daily basis! Kevin and Layla have given us so many ideas it's unbelievable! I think you should all head on over there sometime and check it out for yourself.
So our process went a little something like this:
(Our builder basic kitchen)
1. We measured the length and width of the kitchen cabinets so we knew how much MDF(medium density fiberboard) and crown molding needed. We used MDF because that is what the other blog told us to use.
2. We hopped in the car and off to Lowe's we went (literally the day we closed on the house..I know we are crazy).
3. At Lowe's, we bought 1"x6" MDF board to add height to the kitchen cabinets. We picked out smaller molding (about 1" height) to hide where the MDF and the top of the cabinets meet. Then, we chose the larger crown molding (about 3 " height) that will go on the top of the MDF board. Lastly, we bought two 1x2 boards for support behind the MDF (pictures below).
4. Once we had all the materials, it was just a matter of cutting everything to size (Lowe's will do for you for free except anything that needs to be cut at an angle...score!).
5. Back at home, we started by nailing the 1x2 to the top of the cabinets.
Sorry I don't have a picture of just the 1x2 up. The guys started on the project when I was out at Sherwin Williams...but I think you get the point.
6. After the 1x2's were up, it was then time for the MDF boards. We nailed the 1x6 MDF boards to the 1x2's.
(Jared is our long time friend and amazing handyman that basically did most of the project for us. Being first time DIYer's, it's nice to have an expert hand right down the road!)
7. Now it's time to cut the crown molding to size. The corner part of the crown molding needs to be cut at a 45 degree angle (FYI Lowe's doesn't cut anything at an angle).
We used a miter saw for cutting the crown molding to make sure the 45 degree angles were accurate. Once again, it's nice having a handyman like Jared who owns all these tools!
8. Next, we put up the smaller crown molding where the MDF and top of cabinets meet.
Below is a good picture of why you definitely need the smaller crown molding where the 2 boards meet.
Holding and nailing in the crown molding....
9. It was now finally time for the larger crown molding to be nailed on the top....yay!! So once again, we measured and nailed the crown molding.
The small board over on the left hand side is what Jared used to measure the distance between the lower and higher crown molding. Definitely a good idea because you want to make sure the molding isn't crooked!
10. Lastly, its time for the final touches, the caulking! You want to make sure you caulk where the boards meet and the holes where the nails are. If you don't, then when you go to paint you will see the holes and your project won't look as pretty and custom made as you envisioned in that creative mind of yours!

Tony felt pretty confident that he could do this part :)
(Below is just a picture of the cabinets originally so you can compare)
To wrap this up, the parts and tools that you need for this project are:
caulk
wood glue (not necessary but we decided to use it along with the nails to make it extra sturdy)
nails and nail gun (also not 100% necessary, you could also just use wood glue as I read in another blog)1x2 MDF boards
1x6 MDF boards
3 inch crown molding
1 inch crown molding
saw (miter saw if you want to be exact)
This project in total (not including the paint that we will be using) cost us about 100 bucks. You can't beat that right?! Considering the fact that if we were to buy custom cabinets that look like this it would cost us a couple thousand dollars....yuck! That is why....DIY is the biggest BANG for your buck!


No comments:
Post a Comment